lcsim is an interface between Geant4 and the geometry of your detector. It was developed at SLAC for the ILC and HPS projects. Please refer to the documentation on the official lcsim web site for any further insight on the program. A slightly modified version of lcsim has been developed for REDTOP since the original version does not support REDTOP detector geometry. Therefore, the installation of slic-REDTOP requires two steps:
- First, install the developement framework: the java development kit (jdk) and Nepbeans;
- Then, download from subversion the REDTOP related projects and build them (compiling term for java language).
Detailed instructions are given below.
Netbeans + java installation
- The first step is to install the “Java Development Kit” (jdk, containing, among other things, the compiler and the debugger) and Netbeans, the IDE front-end (Integrated Development Environment) that simplifies editing and developing the code. Download the version for your computer architecture from Oracle official site: https://www.oracle.com/technetwork/java/javase/downloads/index.html
- • Assuming your download is jdk-8u201-linux-x64.rpm
- then, from a terminal, type:
- yum -y –nogpgcheck install /[path to your Download area]/jdk-8u201-linux-x64.rpm
- Get the NetbeansJava SE bundle from bundle from the official site. We recommend using Java 64 bits on operating systems which support that architecture.
- Install the downloaded package, according with the operating systems you are working:
- On Windows, just launch the setup;
- On Linux, make the installation script executable and execute it (check the Preferences of your Browser to find out where the file is downloaded.)• Assuming your download is netbeans-8.2-cpp-linux-x64.sh , then, if it is a .sh file:$ chmod +x /[path to your Download area]/netbeans-8.2-cpp-linux-x64.sh$ ./[path to your Download area]/netbeans-8.2-cpp-linux-x64.sh
- On MacOSX Java is usually installed and it one can just use the existing version. To install Netbeans, ad-hoc instructions are available below;
- During the installation, accept all defaults by clicking the button “Next”. We recommend, though, to uncheck the box where you allow for automatic updates of Netbeans.
Configuring NetBeans
Now, launch NetBeans. Since the REDTOP-lcsim software is located in the svn code repository, first get the necessary SVN plugin for NetBeans (in case it has not been installed by default):
- Select Tools-> Plugins->Installed
- Check if the Subversion package is listed and is active (green check sign on the right).
- If it is not there, select Tools-> Plugins->Available Plugins
- then select Subversion-> Install and accept the licence agreement and click finish.
In case the Subversion plugin is not available for your OS, you can add it manually. Download the plugin separately and follow the instructions on this site:
https://netbeans.org/kb/docs/ide/subversion.html
Also, there is a plugin called CVS that the software required, but it did not automatically come installed.Go to this website for instructions.
Alternate instructions
If you have problems installing JDK and/or Netbeans, another excellent set of instructions can be found at this link.
lcsim-REDTOP installation using subversion (recommended method)
- Once the java environment and the Netbeans ID have been successfully installed (see steps above), you can proceed with the installation of the packages (“Projects“, in Netbeans lingo) necessary to perform REDTOP simulations;
- Make sure that the firewall on your local computer allows the traffic trough ports 443, 1901 and 62522 and connect to Fermilab VPN service;
- Next, we get all the projects from SVNrepository. Make sure that the firewall on your local computer allows the traffic trough ports 22644 and 22653.
- In Netbeans, enter the subversion tool by using the following menu steps: Team->Subversion->Checkout…
- In the pop-up window, named “Subversion Repository“, indicate the “Repository URL” of REDTOP: https://t1015-svn.fnal.gov/REDTOP/trunk

- Insert User and Password as provided by your PI. Click “Next”
- The first time you try to connect, you will receive a request to validate you Server certificate. When that happens, bush the button “Accept permanently“.
- In the new window, named “Folders to Checkout“, fill the “Local folder” box with the path where you store your Netbeans projects. Usually, it is in your home directory, namely ~\NetBeansProjects in Linux and C:\Users\<username>\Documents\NetBeansProjects in Windows.
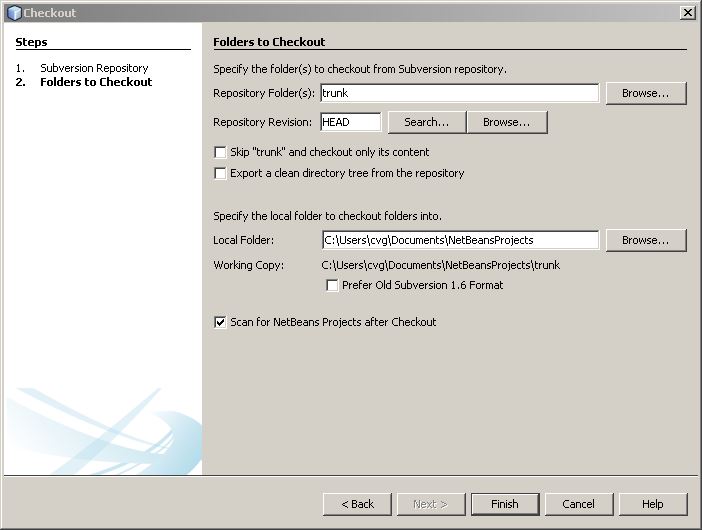
- Make sure that the “Scan for NetBeans Projects after checkout” is marked. Then, browse trough the “Repository Folder(s)” to select those to import into your local computer.
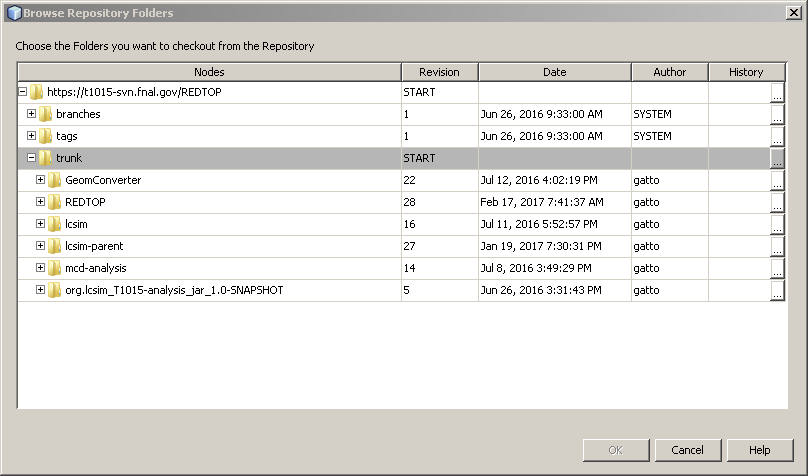
- You will need to import from trunk the following projects:
-
-
-
lcsim-parent
GeomConverter
lcsim
lcsim-contrib
mcd-analysis
org.lcsim_T1015-analysis_jar_1.0-SNAPSHOT
REDTOP
-
-
- Click “Finish”. When you are done with importing the project on your local computer, a pop-up window appears informing you of the status of the operation. If all went OK, the window name is “Checkout Completed”. Push the “Open Project” button: that will close the pop-up and add the imported project to the list of local projects.
- Most likely, after the project has been opened, a pop-up windows will complain that there are problems with the project and it offers to try resolving them. This is due to the fact that some of the dependencies have not been installed yet. To make sure that that is the case, try pushing the button “Resolve Problems…” and find out what is the source of those problems. Disregard them for now: when all projects will be imported, the error message will disappear.
- If the “Projects” pane is not visible in Netbeans, open using the Window->Project menu or hitting Ctrl+1 keys.
- If the project you have just imported does not show up in the “Projects” pane, you need to open it manually. In order to do that, from Netbeans main windows use the following menu sequence:
-
File-> Open Project..
and browse through the Project folders in the NetBeans directory.
-
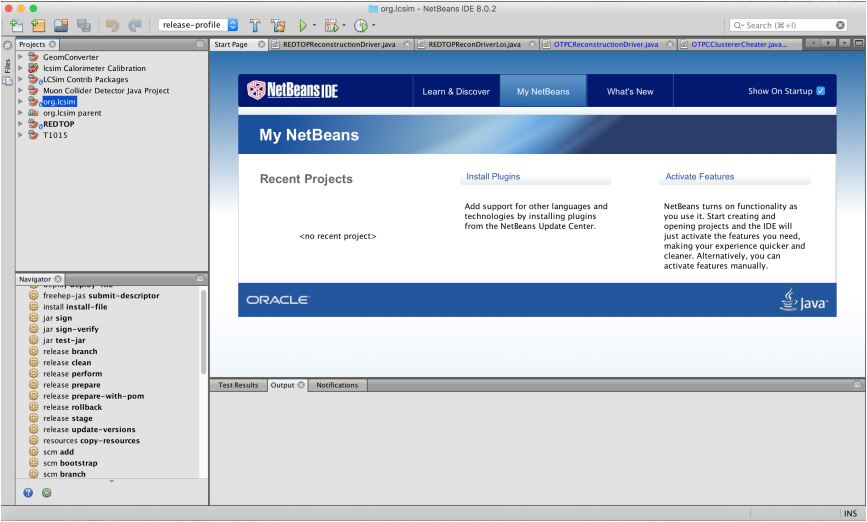
- Once all projects have been successfully imported, the main NetBeans window will look like the one below (with all relevant projects listed in the “Projects” pane) and you are ready to build them:
Building lcsim-REDTOP projects
Building lcsim-REDTOP projects is a bit quirky since there is several inter-dependency among them. Therefore, the cleaning and building had to be done in many attempts to
complete them all. The order of the builds has some importance. Also, it is better to skip the build of the test component of some of the projects (that will also speed-up the future builds).
- To skip the test, right click on the project package and do the following (for example for the org.lcsim package):
-
-
org.lcsim-> Properties->Build->Actions-> Build project -> Add-> skipTests=true
org.lcsim-> Properties->Build->Actions-> Build with dependecies -> Add-> skipTests=true
org.lcsim-> Properties->Build->Actions-> Clean and Build project -> Add-> skipTests=true
Visual instructions for the latter have been provided by B. Fabela in the following document: How to skip building the tests.
-
-
- Repeat the above for the above procedure for GeomConverter and the lcsim projects. A blue mark will appear next to the name of the project.
- Build all projects imported in two steps, by right-clicking on each of the listed in Netbeans “Projects” pane (usually, on the left of the main window)
- select: “clean”. This will clean the project and, also, download and install the missing dependencies. If the download fails, most likely your firewall is blocking the process.
- select: “build with dependencies”.
- Note:
- org.lcsim will not build successfully until GeomConverter has been built;
- To speed up the building process in the future you might want to select to skip the tests the next time you build. In order to do that, right click on the project package and do (for example for the org.lcsim package):
-
org.lcsim_> Properties->Build->Actions-> Build project -> Add-> skipTests=true
org.lcsim_> Properties->Build->Actions-> Clean and Build project -> Add-> skipTests=true
-
- You could keep all the packages grouped together by selecting in Netbeans main window:
-
File->Project Groups...->New group->Create Group
and giving a name to the newly created group.
-
- In some cases (for example, with GeomConverter) the project appears listed with a red exclamation mark. That means that there is a problem with that project, usually , a missing dependency (GeomCoverter need the hep library). To solve it, right click on the project and chose “Resolve Project Problems…”. The pop-up window indicate what the problems are. Click “Resolve” and let Netbeans work on it.
- A common error when building the projects is that one is using the wrong source version. To correct this, right-click on the project name -> properties -> sources -> change source/binary format to 1.7.
lcsim-REDTOP installation using a tarball (not recommended – use only if you do not have a vpn connection to Fermilab)
- Install the original lcsim framework. The step-by-step installation of the original lcsim framework is described in details at this link (another, newer but not necessarily easier tutorial can be found here). Please follow the instructions carefully, until you have a working copy of Netbeans and lcsim.
- Download the following two tarballs with the Netbeans projects and with the detector configuration from the ftp repository. The tarballs areupdated regularly. However, if you want to be sure to have the latest code, please obtain the following two tarballs by issuing the following commands:
-
ftp://t1015-svn.fnal.gov/REDTOP_data/lcsim/.lcsim.rar
ftp://t1015-svn.fnal.gov/0/lcsim/NetBeansProjects.rar
- Unpack NetBeansProjects.rar and overwrite the projects directory in your installation of (the original) lcsim;
- Rebuild lcsim.
Instructions to install the lcsim simulation framework for REDTOP on a Mac
If you want to install and run Netbeans and jas3 on a Macintosh, follow the steps below:
- Download the Java JDK bundle for MacOSX (.dmg file) from: http://www.oracle.com/technetwork/java/javase/downloads/jdk8-downloads-2133151.html
- Proceed with the installation by opening the .dmg file.
- Add the following lines to your ~/.bash_profile file: export JAVA_HOME=”/Library/Java/JavaVirtualMachines/jdk1.8.0_111.jdk/Contents/Home/” export PATH=$JAVA_HOME/bin:$PATH
- Download the Java JDK bundle with NetBeans 8.0.2 for MacOSX (.dmg file) from the Oracle site.
- Install NetBeans by opening the .dmg file by following the instructions in the popup window.
- To get the lcsim-REDTOP software, please http://www.oracle.com/technetwork/java/javase/downloads/jdk-7-netbeansdownload-432126.html follow the instructions in the section “lcsim-REDTOP installation using subversion (recommended method)“
You can also download the instructions prepared by B. Fabela: Instructions-lcsim-REDTOP-MacOSX
Detectors condition
Most of the reconstruction and analysis projects require that the detector conditions (geometry, digitization parameters, etc.) be present in a folder named .lcsim. This folder MUST reside in the home directory of the user. You can get those conditions in one of the following ways:
- Use subversion to get the files from:
https://131.225.135.132/svn/.lcsim
This is the preferred mode since you will be connected to the most up-to-date source of information.
- Download the following tarball:
ftp://t1015-svn.fnal.gov/REDTOP_data/lcsim/.lcsim.rar
or, the backup tarball:
ftp://t1015-svn.fnal.gov/lcsim/.lcsim.tar.gz
and unpack it into your home. The final directory structure will be:
- home
- .lcsim
- detectors
- cache
- .lcsim
- home
- The latter is the least preferred way of installing the detector conditions as the tarball is updated infrequently. If there are problems with your browser, try using filezilla.
Maven2 repository (optional)
Netbeans needs Apache Maven2 to work properly. That ‘s how all the dependencies are handled. When you run a NetBeans project, those dependencies are downloaded from internet on your local repository: a .m2 folder in your home directory. In general, you do not need to worry about, since the download is automatic. Sometimes, especially if you have never run lcsim-REDTOP before, the Maven2 server is unavailable and the projects cannot be built. A safe way to circumvent such problem is to download manually the repository on your local system. This folder MUST reside in the home directory of the user. You can get those conditions in one of the following ways:
- Use subversion to get the files from:
https://131.225.135.132/svn/.m2
This is the preferred mode since you will be connected to the most up-to-date source of information.
- Download the following tarball:
ftp://t1015-svn.fnal.gov/REDTOP_data/lcsim/.m2.tar.gz.
and unpack it into your home. If there are problems with your browser, try using filezilla.
Visualization of the output
The output of the reconstruction is, usually, an .aida histogram file and/or a .slcio file. Both could be visualized using jas3. The instructions could be found here. Alternatively, you can download a fully configured version of jas3 from one of the following links:
ftp://t1015-svn.fnal.gov/0/software/jas3.1.1.rar
http://jas.freehep.org/jas3/Download.html
and unpack it into a local working directory.
Examples
Example #1: reading and analyzing an .hepevt file from GenieHad
This example will read an hepevt file generated with GenieHad and produce an aida file with plots and ntuples of selected kinematic variables.
- Download an .hepevt file of your choice from:
ftp://t1015-svn.fnal.gov/v501/hepevt/
- In the left panel, under projects, you will see a long list of projects, including a project called REDTOP. If not, you need to import all your projects manually (some systems do that automatically). make sure to import the project REDTOP.
- In the project REDTOP, there is a source project named REDTOPMC, containing 3 java files. Double-click on HepEVTAnalysis.java. It has a green arrow indicating that it can be run directly.
- The project will open in the editor. Starting from line 72 there is a list of hepevt filenames (with the full path) hardcoded. Replace the list with the file(s) you want to analize. Do the same also with the filename at lines 92 and 203. Then save.
- To run it, right-click on HepEVTAnalysis.java again, then select “Run file”. It will recompile and, then, run.
- If it runs successfully, an aida file will be generated in the home\NetBeansProjects\REDTOP directory. It contains the histograms and nt-uples filled by HepEVTAnalysis.java
- In order to see those, install and run jas3 (instructions are on this page). Then: File->Open data source->Aida File (.aida)…
- Open the file you have produced. An example aida file is downloadable form ftp://t1015-svn.fnal.gov/lcsim/
You could experiment by modifying and/or adding more plots or ntuples. In order to do that:
- Modify the HepEVTAnalysis.java file according to your goal. Please, refer to the aida instructions for a basic understanding of the syntax.
- Right-click on the REDTOP project (in the left project panel) and select “build”;
- Follow the instructions above to run the example again.
Example #2: reading hits from a .slcio file obtained with slic and making some plots
This example will read an slcio file produced with slic-REDTOP and produce an aida file with plots and ntuples of selected kinematic variables and detector hits from Geant4.
- Download an .slcio file of your choice from:
ftp://t1015-svn.fnal.gov/v802/slcio/
- In the left panel, under projects, you will see a long list of projects, including a project called REDTOP. If not, you need to import all your projects manually (some systems do that automatically). make sure to import the project REDTOP.
- In the left panel listing all projects, right-click on REDTOP project and select “Set as main Project“. The project name will changed into a bold typeset. There is no need for this step if REDTOP is already your main project.
- In the top toolbar of Netbeans (just under the menu bar) you have to indicate the configuration you are running. For now, use the <default config>
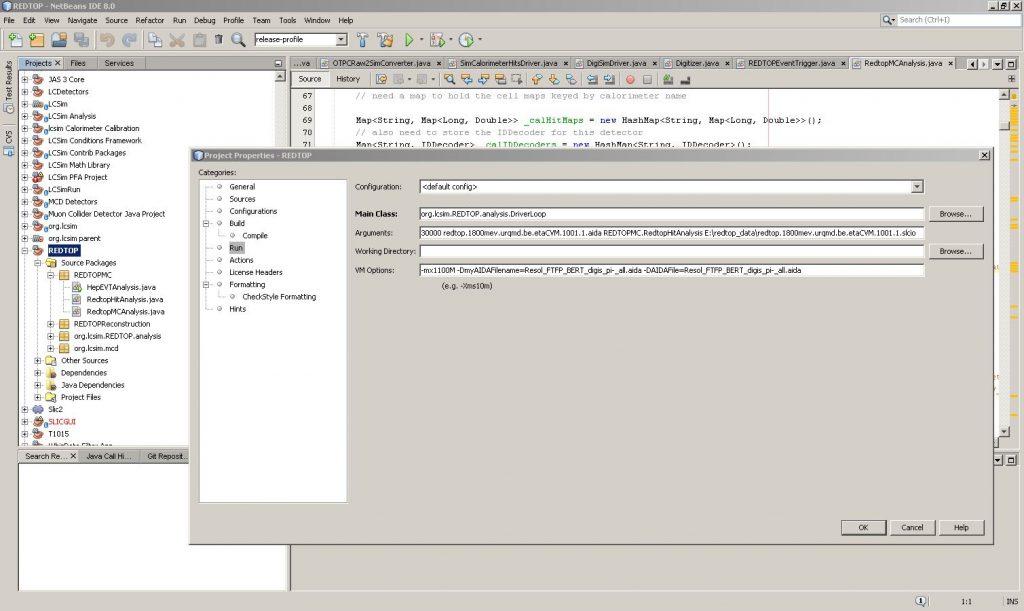
- In the Project panel (usually on the left of Netbeans) select the project REDTOP. Right-click on that and, from the popup menu, select: Properties. A new window will pop-up withe the title: Project Properties – REDTOP;
- In the top toolbar of Netbeans (just under the menu bar) you have to indicate the configuration you are running. For now, use the <default config>
- In the Project panel (usually on the left of Netbeans) select the project REDTOP. Right-click on that and, from the popup menu, select: Clean and build;
- When it is done building, if everything went OK, you will get a green message saying: BUILD SUCCESS. Otherwise, something went wrong. It could be a missing project. If that is the case, import it manually into NetBeans using the menu: File->Open project…
- Now, we need to give the project the arguments to run correctly. In order to do that, right click on the project package and make sure that the following parameters are present :
-
REDTOP->Properties->Run->Configuration: -> <default-config>
REDTOP->Properties->Run->Main Class: -> REDTOPanalysis.DriverLoop
REDTOP->Properties->Run->Arguments: xxx yyy.aida  REDTOPMC.RedtopHitAnalysis zzz.slcio
REDTOP->Properties->Run->VM Options: -mx1100M
where (see also the picture below):
- xxx is the number of events to process;
- yyy.aida is the filename of the output histogram file;
- zzz.slcio is the filename of the input data file (slcio format)
-
- The pop-up properties window, will, then, look similar to the image below. Edit the “Arguments” input box according to your input/output files ans enter the four arguments mentioned above.
- Click the OK button. The pop-up window will close
- Make sure that in the config textbox, at the center of the top toolbar of Netbeans, the <default-config> is selected.
- To run the example, right-click on the REDTOP project name (in the left panel) and select “run”. Alternatively, click on the right green arrow in the middle of Netbeans toolar.

If everything goes well, Netbeans will inform you with a green message in the output panel (usually in lower area of the IDE) indicating success. If the message is red, something went wrong: please, follow the hints to find the problem. The output aida file is located in the REDTOP Project directory. In order to see those, install and run jas3 (instructions are on this page). Then: File->Open data source->Aida File (.aida).
You could experiment by modifying and/or adding more plots or ntuples. In order to do that:
- Modify the RedtopHitAnalysis.java file according to your goal. Please, refer to the aida instructions for a basic understanding of the syntax.
- Right-click on the REDTOP project (in the left project panel) and select “build”;
- Follow the instructions above to run the example again.
Example #3: reconstructing a .slcio file from slic simulations
- Download an .slcio file of your choice from:
ftp://t1015-svn.fnal.gov/v802/slcio/
- In the left panel, under projects, you will see a long list of projects, including a project called REDTOP. If not, you need to import all your projects manually (some systems do that automatically). make sure to import the project REDTOP.
- In the left panel listing all projects, right-click on REDTOP project and select “Set as main Project“. The project name will changed into a bold typeset. There is no need for this step if REDTOP is already your main project.
- In the top toolbar of Netbeans (just under the menu bar) you have to indicate the configuration you are running. For now, use the <release profile>
- In the Project panel (usually on the left of Netbeans) select the project REDTOP. Right-click on that and, from the popup menu, select: Properties. A new window will pop-up withe the title: Project Properties – REDTOP;
- In the pop-up properties window, edit the right panel in a way that looks like the image below;
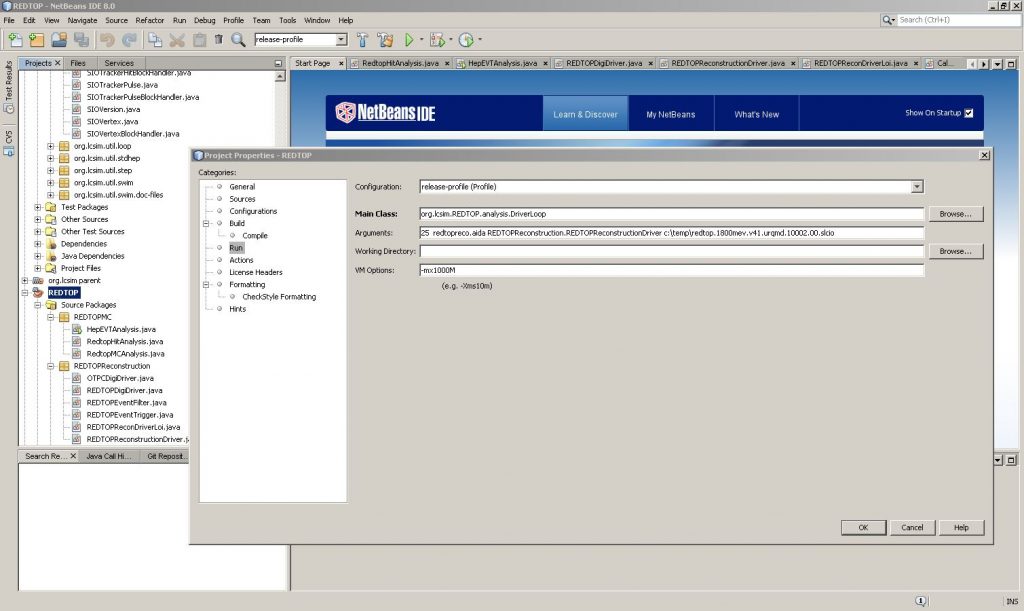
- Edit the “Arguments” input box according to your input/output files. Four arguments are required:
- the number of events to process;
- the name of the output aida file with the plots and the ntuples eventually filled by the main program;
- the name of th emain driver (usually is REDTOPReconstruction.REDTOPReconstructionDriver);
- the name of the .slcio input file (with full path).
- Click the OK button. The pop-up window will close
- Make sure that in the config textbox, at the center of the top toolbar of Netbeans, the <release-profile> is selected.
- To run the example, right-click on the REDTOP project name (in the left panel) and select “run”. Alternatively, click on the right green arrow in the middle of Netbeans toolar.

If everything goes well, Netbeans will inform you with a green message in the output panel (usually in lower area of the IDE) indicating success. If the message is red, something went wrong: please, follow the hints to find the problem. The output aida file is located in the REDTOP Project directory while the slcio file is located in your home. In order to see those, install and run jas3 (instructions are on this page). Then: File->Open data source->Aida File (.aida) and File->Open data source->LCIO Files (.slcio,…). In order tobrowse an slcio file, you need to open an Lcsim Event Browser by using the following jas3 menues: File->New…->Lcsim Event Browser.
Then, click on the right arrow in the top toolbar to browse through the vent in the slcio file..
You could experiment by modifying and/or adding more plots or ntuples. In order to do that:
- Modify the RedtopHitAnalysis.java file according to your goal. Please, refer to the aida instructions for a basic understanding of the syntax.
- Right-click on the REDTOP project (in the left project panel) and select “build”;
- Follow the instructions above to run the example again.