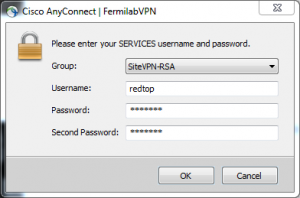
Fermilab VPN
Fermilab has recently increased the security level for connecting trough a VPN. That involves several steps. A simplified guide to this cumbersome process is presented below.
Step 1: Obtaining a Fermilab Services account
This is the account you use for your Fermilab emails. If you have an account already, skip to step 2.
- Use Fermilab’s Service-now systems by filling and submitting the following “Request for Fermilab Visitor ID and computer accounts form” .
- In the “Provide your information” area, fill the fields with your institutional information.
- In the “Provide your affiliation” input field, select t: REDTOP.
- In the “Fermilab contact name (first and last)” input field, enter: Corrado Gatto.
- In the “Fermilab contact phone” input field, enter: x3377.
- In the “Fermilab contact email” input field, enter: gatto at fnal.gov
Submit the form and wait for a reply by the helpdesk@fnal.gov, usually with the parameters of the approved account.
Step 2: getting a RSA soft-key
Before attempting any connection, you need to set up on a cell phone a key generator which will provide a numeric code needed when requested. This can be done in two ways:
- Use Fermilab’s Service-now systems by filling and submitting the following request form .
- Send an email to servicedesk@fnal.gov with the subject “Request for RSA soft token” and a polite message in the body. Then, follow the instructions contained in the reply.
Once your request has been fulfilled, you will receive an email with the following subject: “RITMxxxxxxxx: RSA Request completed” and a message telling you that a software token has been issued for your Android device. The token last only for a limited amount of time and you need to insert it into the Android app within about two days.
Step 3: Setting the PIN
Before installing the RSA soft-key in the app, you need to set up a PIN.
- Go to https://rsa.fnal.gov/ and login with your service accont userid and password.
- The Fermilab rsa self-service console opens. Select Create PIN.
- Enter a 4-digit pin number in form that pops-up
Go to Step 4 below.
Step 4: obtaining the Android app and install the token
- You must download the RSASecurID app from Google Play, the Microsoft Store, or the Apple Store, and activate your token by following the steps in this article.
- The first time you open the RSASecurID app on your cell phone you will be asked to provide a toke. That is an http link that you have received from Fermilab’s helpdesk after completing Step 2 above. Do not copy the location of the link, because it may be intercepted by the Proofpoint service, which rewrites links for cybersecurity purposes. The RSA app will not accept a Proofpoint link.
- You must set up a PIN. Follow these instructions.
Step 5: obtaining a certificate for your web browser
Before connecting to Fermilab you need to download a “Fermilab Root CA” certificate on each device on which you use VPN. If you do not have a properly configured certificate, you will receive an error message once you attempt to log in to the VPN system. The procedure is diffeent depending on the OS on your computer. Please, following the links below (or any lin in those pages redirecting to a latest version).
- Windows computers:https://fermi.servicenowservices.com/kb_view.do?sysparm_article=KB0012906
- Mac computers: https://fermi.servicenowservices.com/kb_view.do?sys_kb_id=9824dd4d1b9c20500a91eb5ce54bcb47
- Mobile devices: https://fermi.servicenowservices.com/kb_view.do?sysparm_article=KB0012905
- Linux computers: https://fermi.servicenowservices.com/kb_view.do?sysparm_article=KB0012914
Step 6: Setting up Fermilab’s VPN network
- Go to https://vpn.fnal.gov and log in with your Services account. In the GROUP dropdown box, select: “SiteVPN-RSA”
- This will automatically install CISCO AnyConnect VPN. Otherwise, follow the instruction to download and install that software program
Step 7: Connecting to Fermilab’s VPN network
- Launch RSASecurID app on your mobile and get a Token
- Open CISCO AnyConnect VPN and connect to: vpn.fnal.gov. A pop-up window will appear on your screen.
- In “Username:” enter your Services account username (namely, the one corresponding to your fnal email)
- In “Password:” enter your Services password
- In “Second Password:” enter your pin (which you got in step 2 above) immediately followed by the RSASecurID Token
- Click OK and wait for a response from CISCO AnyConnect

